
Latency is the delay between the moment your camera captures something and the moment your viewers see it in their player.
Low latency means less time in transferring video data from point A (your streaming headquarters) to point B (your audience’s players). A high latency means more.
Normally, your stream reaches viewers after about 20 seconds. With our Low Latency (beta) feature, that drops to roughly 2-5 seconds.
Do you actually need it? #
Most likely, no. For the vast majority of live streams, a 20-second delay simply doesn’t matter, and your viewers will never notice it. Nobody watching a concert, a church service, a conference, a class, a fitness session or a performance can tell whether they are seeing it 20 seconds late or 3 seconds late – they have nothing to compare it against.
Low latency is worth turning on when your viewers have a second source of information that would otherwise spoil the stream, or when the timing itself is part of the event:
- Live auctions and bidding – a bid placed 20 seconds late is a bid that arrives too late.
- Sports and live events – where viewers are also following a live score, a betting app or social media on a second screen, and would learn the outcome before seeing it.
- Gaming and co-watching – where you react to your audience live while playing.
If your stream isn’t one of these, we recommend leaving Low Latency off. The standard delay buys your viewers a much smoother, more reliable playback – see the trade-off below.
Turning it on #
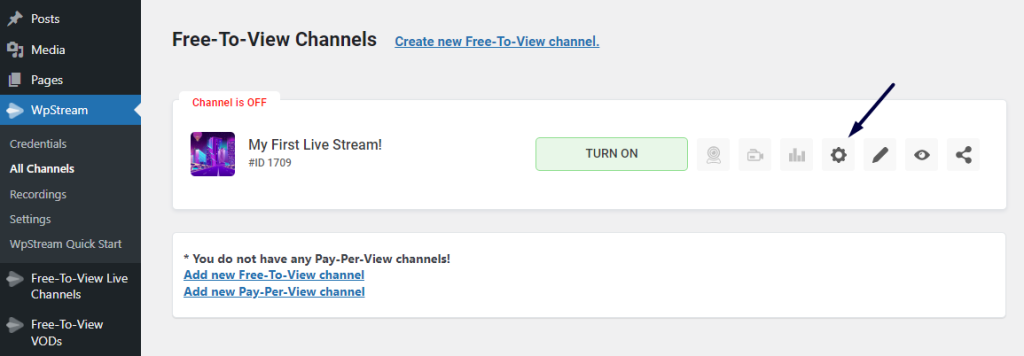
To enable the low latency feature for your live stream, you will need to go to your Channel and click on ‘Channel Settings’:
A pop-up with the channel settings will appear and you will have to enable the ‘Low Latency (beta)’ feature:
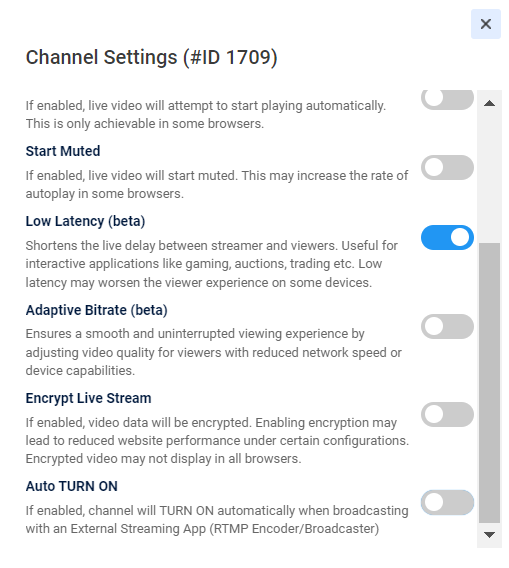
You can then TURN ON your channel to live stream and the latency will drop from around 20 seconds down to about 2-5 seconds.
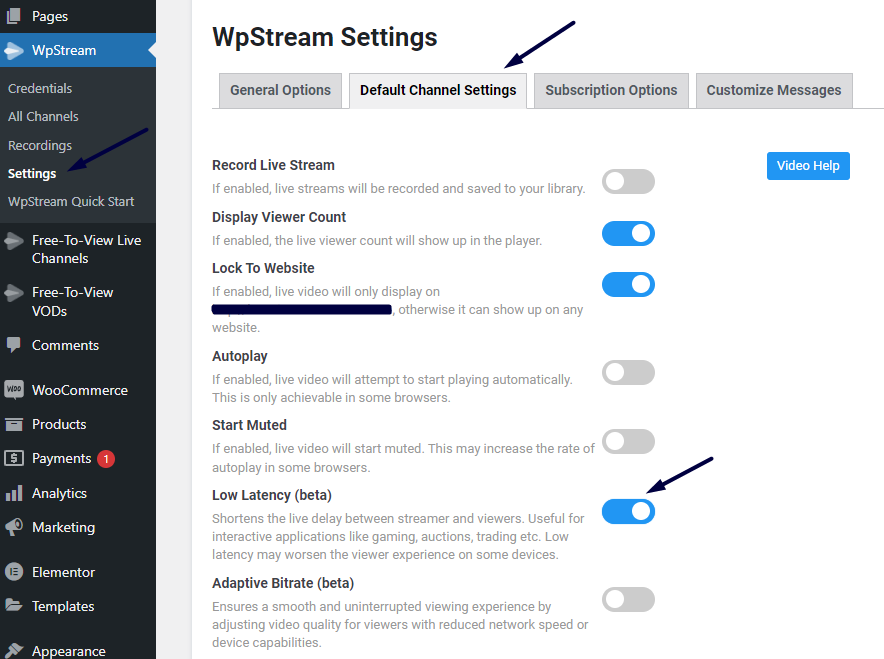
To enable this feature as a default setting for all new channels created, go to WpStream Settings > Default channel settings > Enable Low Latency (beta)
Settings for your broadcasting software #
Enabling the feature in WpStream is only half of it. If your broadcasting software (OBS, Streamlabs, vMix, your encoder box, etc.) is sending video in large, infrequent chunks, there is nothing we can do at our end to deliver it any faster. These settings let it send video in a steady, fine-grained flow instead:
- Keyframe interval: 1 second. This is the important one. Think of a keyframe as a fresh, complete picture – viewers can only start playing (or catch up) at one of these. One per second keeps the delay short. Anything longer and low latency simply won’t work well.
- Rate control: CBR (constant bitrate). A steady, predictable flow of data is easier to deliver quickly than one that surges and dips.
- B-frames: 0. These are a compression trick that requires the player to wait for later video before it can show the current picture – exactly what you’re trying to avoid.
- Resolution: 720p is plenty. Pushing 1080p or 4K means a lot more data to move, which works against you. If you are unsure, drop a step down – a smooth 720p stream beats a stuttering 1080p one every time.
- Bitrate: match it to your resolution – see the ranges just below.
Bitrate by resolution #
Bitrate is how much data your stream uses per second. Too low and the picture looks blocky; too high and it becomes a struggle to deliver on time, which is the opposite of what you want here. Always start at the lowest number in your range, and only work your way up gradually, a small step at a time, if the picture genuinely looks bad. With low latency, the lower the bitrate, the better – a modest-looking stream that plays smoothly is always the better outcome.
- 480p (854×480) – start at 600 kbps, up to 1,200. A good choice if your upload is modest or your audience is mostly on mobile data.
- 720p at 30fps (1280×720) – start at 1,500 kbps, up to 2,500. The sweet spot for low latency, and what we recommend for most streams.
- 720p at 60fps – start at 2,500 kbps, up to 3,500. Only worth it for fast motion, such as sports or gaming.
- 1080p at 30fps (1920×1080) – start at 3,000 kbps, up to 4,500. Usable, but it makes low latency harder to sustain.
- 1080p at 60fps – start at 4,500 kbps, up to 6,000. We would not recommend this together with low latency.
These numbers are deliberately conservative. They are lower than you will see quoted elsewhere, because those figures are written for normal streaming, where a big buffer hides the strain. Low latency has no such buffer, so a bitrate your connection can handle easily is worth far more than a high one it can only just manage. Whichever you pick, your internet upload speed needs to comfortably exceed it – as a rule of thumb, aim for at least double your chosen bitrate. Run a speed test and check the upload figure, not the download one, which is usually much higher. If your upload is already struggling at normal latency, low latency will struggle a great deal more.
In OBS these are all found under Settings > Output (set the Output Mode to “Advanced” to see the keyframe interval and B-frames).
Low Latency and Adaptive Bitrate #
You can switch both on for the same channel, but we do not recommend it. Adaptive Bitrate automatically serves each viewer the quality their connection can cope with, and to do that it relies on the very reserve of video that Low Latency takes away. The two also want different keyframe settings – 5 seconds against 1. Run them together and each works less well than it would on its own, so pick the one your stream actually needs.
What we do at our end #
Once your video reaches us, the rest is our job, and we have built the fastest path we know how to build.
- We touch your video as little as possible. Every extra step a platform performs on a live stream – re-encoding it, repackaging it, passing it through additional checks – costs time that your viewers end up waiting through. We keep ours to the bare minimum, so almost none of the delay you see is us.
- Your stream reaches us through Amazon’s private global network. The moment it leaves your computer, it enters that network at the nearest entry point to you – there are hundreds around the world – rather than taking its chances hop by hop across the ordinary public internet. It is the difference between a dedicated express lane and rush-hour traffic.
- Your viewers are served by several of the world’s largest delivery networks at once. Rather than relying on a single provider, we use a number of them together, and each viewer is automatically served from whichever one is fastest and closest to them at that moment. If one has a bad day, the others carry the load.
This is why the numbers above are achievable at all. It is also why the settings in your broadcasting software matter so much: with our part of the journey already about as fast as it can be, what is left is the bit before your video reaches us, and the bit after it leaves us for each individual viewer.
The trade-off: it can make things worse #
Low latency is not simply “better”. It is a trade, and some of your viewers may end up with a worse experience because of it.
Normally, a player quietly stores up a few seconds of video before showing it to the viewer – a safety reserve. If their connection hiccups for a moment, the player keeps playing from that reserve and the viewer sees nothing wrong. That reserve is precisely what causes the delay.
Low latency works by shrinking that reserve down to almost nothing. The picture arrives sooner, but there is no longer a cushion to absorb a bad moment on the viewer’s connection. Viewers on weak wifi, mobile data or a congested network are far more likely to see buffering, stalling and stuttering than they would have on a normal stream.
We do everything we can at our end to keep this smooth, but we cannot control the network between us and each individual viewer. So the honest summary is: if a few seconds of delay would not change anything for your audience, leave Low Latency off and give them the steadier stream instead.


